
A classically trained chef's method for how to frost a cake with smooth frosting and clean edges. And the bakery secret that makes every layer taste better. No special tools, just a simple system that works every time.
Jump to:
The Quick Take
Total time: About 2½ hours (mostly hands-off)
What you need: Five to six cups of buttercream, chocolate ganache, or any frosting, an offset spatula, and a chilled cake.
The bakery secret: Brush each cooled layer with simple syrup before frosting. It keeps the cake as moist on day three as it is on day one.
The Professional Method, Simplified
All professional bakers use the same approachable technique: a thin first coat to seal in crumbs (the "crumb coat"), a chill, then a smooth final coat of buttercream. That's the whole method. No exotic tools, and no pastry school required.
During my time at SusieCakes Bakery in Los Angeles and years of work as a private chef, I learned that beautiful layer cakes come down to temperature, patience, and a few reliable tricks - not expensive equipment. A small offset spatula and the back of a spoon will take you further than most gadgets. That said, a few inexpensive tools make the process faster and results more consistent:
- Offset spatula (small and/or large): the most useful tool you can own for cake work.
- Bench scraper (flexible or stainless steel): creates the smoothest sides.
- Cake turntable: not essential, but worth it if you bake more than a few times a year.
- Cake boards: Very helpful if the cake needs to travel; optional otherwise.
- Parchment paper: When cut into strips and placed under your unfrosted cake, it helps keep the plate clean while you decorate. More for vanity than function.
On cake boards: Place the cake on a board the same size as the cake itself. This lets you lift and rotate the cake safely and press garnishes into the sides. You can also use the insert from a tart or springform pan. After decorating, move the cake to a slightly larger decorative board or cake plate. No travel? A flat plate with parchment strips underneath works just as well.

The Bakery Secret
Brush each cake layer with simple syrup before frosting, and it locks in moisture and keeps the crumb tender for days. This is a step that takes a cake to that next level, and few recipes mention it. Simple syrup is a 1:1 mixture of sugar and water, briefly boiled and cooled. It also allows you to add flavor without changing the batter; steep citrus peel, fresh mint, or fruit juice into the syrup while it's warm.
To make simple syrup: Combine ½ cup of granulated sugar and ½ cup of water in a small saucepan. Bring just to a boil, stir until the sugar dissolves, then remove from the heat and cool completely. Store refrigerated for up to one month.
For an adult occasion, skip the syrup and brush the layers with a complementary liqueur instead. Coffee, chocolate, or a fruit-based liqueur all work beautifully.
For deep dives like this on technique, recipes, and to access my French Macarons: Simplified series, subscribe to my newsletter on Substack.
Step-by-Step Guide
Bring your frosting to room temperature before you start. If it was chilled, beat it briefly or whisk it to restore its texture and workability.
Step 1: Chill the Cake Layers
This is the single most impactful thing you can do when frosting a cake. Cold cake layers shed dramatically fewer crumbs than room-temperature ones, which means less mess in your frosting and a smoother final coat.
At a minimum, your cake should be completely cool before you start. Chilled is better, frozen is best. Freezing cakes and layers is standard practice in professional bakeries. If you're freezing layers ahead of time, trim any domed tops after baking with a serrated knife. Then wrap or seal tightly and freeze (see Step 2 below).
Step 2: Trim & Level the Layers
A flat layer is a stable layer. Use a serrated knife to slice off any domed tops so each layer sits perfectly level when stacked. This prevents the finished cake from leaning or sliding.


For more impressive cross-sections - and more filling in every slice -cut each layer in half horizontally. This technique, called "torting," is how bakeries turn two cake rounds into a four-layer showstopper. Only worth doing if your layers are at least an inch tall, ideally close to two inches high. Work slowly with the serrated knife, keeping it as level as possible and rotating the cake as you cut. If you own a cake leveler tool, this is its moment.

Step 3: Build the Layers & Apply the Crumb Coat
Start by dotting a tablespoon of frosting in the center of your cake board or plate. This anchors the bottom layer and stops it from sliding as you build upward.
Place the first layer on top of the dollop of frosting, flat side down. Brush it with simple syrup, if using. Add about a half cup of frosting to the center and spread it evenly to the edges. Repeat with each layer: stack, syrup, frost. Place the final layer upside down (flat side up) so the top of your cake is perfectly level, and brush it with syrup.
Last, spread a thin layer of frosting over the entire cake, top first, then sides. This is the crumb coat. It doesn't need to look good; it needs to trap every loose crumb so they don't show up in your final layer. Scrape it as thin as you can.
Chef’s Tip
After each pass, wipe your spatula clean on a bench scraper, small bowl, or towel and work from that instead of dipping back into the main batch of frosting. This keeps your buttercream or ganache free from crumbs for the final coat.


Step 4: Chill
Refrigerate the crumb-coated cake for at least two hours, or until the frosting feels firm to the touch. The freezer works faster if it fits. You can apply the crumb coat a day or two ahead and keep the cake chilled until you're ready to finish decorating.
Step 5: Apply the Final Coat
Scoop several cups of frosting onto the top of the chilled cake. Spread it across the top and down the sides, adding more as needed to cover the crumb coat completely and cover any thin spots. For the smoothest possible finish, refrigerate the frosted cake briefly before adding any final touches. Cold buttercream is more forgiving than warm if you need to scrape away a mistake.


- To smooth the top: Hold your offset spatula at a shallow angle and draw it across the surface in gentle, overlapping strokes. With a turntable, keep the spatula steady and let the cake rotate, slowly guiding the blade outward from the center as the frosting smooths.
- For the sides: Hold the spatula or bench scraper vertically at a slight angle and rotate the cake - or spin the turntable if you have one - while keeping your hand still. The rotation does the smoothing for you.
Five Easy Decorating Techniques
Frosting Waves
Load an extra cup of frosting onto the top of the finished cake. Using the back of a small spoon, press gently into the frosting and lift away with a circular motion. Alternate clockwise and counter-clockwise swoops, to create soft peaks and valleys. Work from the center out, in concentric circles. The technique is very forgiving: You can redo any wave easily until you're happy with the result.

Whimsical Vertical Lines
Add a thicker layer of frosting to the sides than you otherwise would. Starting at the bottom of the cake, draw the tip of a small offset spatula straight up the side in one motion. Move the spatula slightly and repeat, working around the entire cake. The upward strokes leave small peaks at the top edge — a polished, intentional-looking finish. Top with fresh fruit, French macarons, or a few cookies to complete it.


Side Garnishes
Cookie crumbs, sprinkles, cocoa nibs, or chopped nuts pressed into the sides of a frosted cake create a professional, textured finish that looks like far more effort than it is. For this to work cleanly, your cake needs to be on the same-size board so you can lift it safely.
Hold the bottom of the cake board with one hand while pressing garnishes on with the other. Work over a rimmed pan to catch what falls. Rotate as you go until you get your desired effect.


Simple Piped Border
A pastry bag (or zipper food storage bag with the corner snipped) and a small pastry tip are all you need for a polished border around the bottom of the cake. A round tip or star tip works best. Hold the bag at roughly 45 degrees and pipe small stars or dots in a continuous line. Skip the parchment strips for this technique, or remove them prior. Pulling them away afterward will ruin your handiwork.

Cookie Crumble Top
The easiest finish of all. Place whole cookies around the perimeter of the top layer and scatter crushed cookies across the center. Crushing them in a zip-close bag with a rolling pin is the cleanest method. And the one most likely to keep any enthusiastic young bakers busy.

Frequently Asked Questions
Cool the cake completely, as any residual heat will melt the buttercream. For best results, wrap the pan well and freeze (this is standard in bakeries). Once cold, dollop enough frosting to cover the top with a half-inch of buttercream and spread it evenly. The back of a spoon or a small offset spatula or the back of a spoon.
The key is working with cold cake and room-temperature frosting. Apply a thin crumb coat first and refrigerate until firm, then apply your final coat. To smooth the frosting on top, hold an offset spatula at a shallow angle and gently smooth across the top of the cake. For smooth sides, hold a bench scraper or offset spatula at a slight angle against the frosting and rotate the cake plate or spin the turntable. Working in small sections for the top and the sides gives the decorator the most control.
Whipped cream is a light and delicious choice for frosting, but it is less stable and harder to work with for smooth finishes. It doesn't hold up at room temperature very long and can't be piped quite like buttercream. A great buttercream alternative similar to whipped cream is Italian meringue. Frost with whipped cream or Italian meringue shortly before serving, and keep the cake chilled. 
A crumb-coated cake can be refrigerated for one to two days before applying the final coat. A finished buttercream cake holds well for up to five days chilled, especially if you soak the layers in simple syrup. Always bring buttercream cakes to room temperature before serving (a couple of hours on the counter), which allows the flavors to bloom and softens the crumb.
Yes, refrigerating (or even freezing) cake layers before frosting is one of the most impactful things you can do for a smoother finish. Cold cake sheds far fewer crumbs, which means less mess to deal with when applying a crumb coat and an overall smoother finish. Many professional bakeries freeze their layers overnight before decorating.
The Honest Shortcut
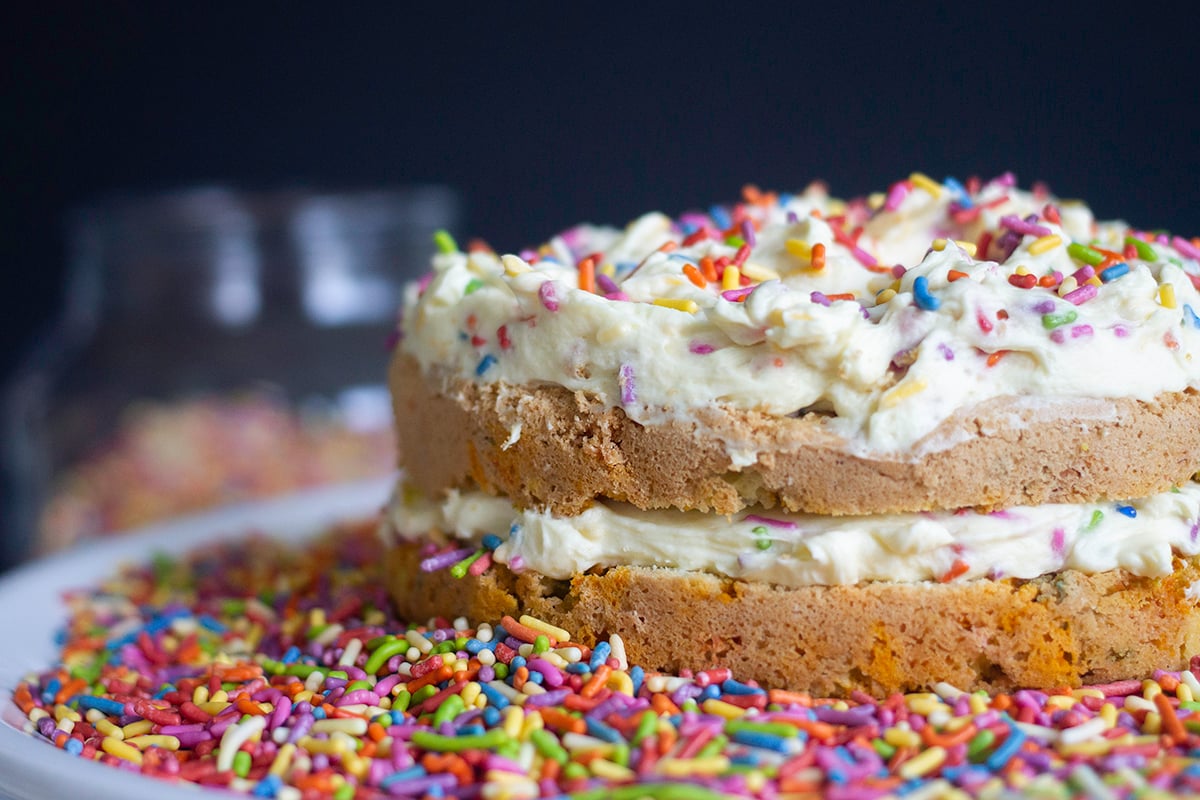
When you don’t feel like fussing, frost the layers generously and finish with a scatter of sprinkles. That’s it. A naked cake with thick, imperfect swoops of frosting is joyful, unfussy, and takes five minutes. The steps above are for when you want a clean, polished finish. This is for when you just want cake. Both are delicious.
Eat Informed
The Edible Times Newsletter on Substack, written by Chef Christina, covers the nutrition science behind ingredients and recipes every month. Complete with a new nutrient-dense, approachable recipe. And baking, of course.
Totally Free. No ads. No brand partnerships.


Debbie Peck
Decadent & delicious! The simple syrup is genius! Thank you!!
Chef Christina
My pleasure! Glad it worked well for you.
Kristin
I needed these tips!!! My son’s birthday cake looks amazing.
Christina
So happy to hear, Kristin! And Happy Birthday to your little guy.:)
Joan W
I can testify that the cake not only looked great, but tasted wonderful!
edibletimes
🙂 🙂 🙂