
A classically trained chef’s fruit tart recipe. Complete with a guide to making a tart with a crisp, buttery crust, silky pastry cream, and stunning fresh fruit. A reliable recipe that is easy and delicious.
Jump to:
On Fresh Fruit Tarts
What separates a fruit tart worth making from one that simply looks good is the crust and the cream. The crust should be crisp and buttery, able to hold its shape without going soft. The pastry cream should be smooth and rich, not starchy or overly sweet. Not to leave out the fruit - it should be in season and the best you are willing to buy.
This version, and many tart recipes, use a simple 1–2–3 cookie dough for the shell and a classic crème pâtissière (pastry cream) for the filling. The crust is an easier version of pâte sucrée, a sweet pastry crust made with almond flour and eggs. For an uber-luxurious filling, the pastry cream can be lightened with whipped cream for crème diplomate, or diplomat cream. Both come down to basic technique, not difficulty.
The method is based on classical French pastry taught at Le Cordon Bleu in Paris (I took pastry classes there in addition to my CIA degree). It is the same approach used in professional kitchens, scaled for home bakers.
On Ingredients
Everything beyond the fresh fruit is a baking staple: butter, sugar, flour, eggs, and milk. Cornstarch thickens the pastry cream. Brushing warmed apricot jam on the fruit gives it bakery flair.
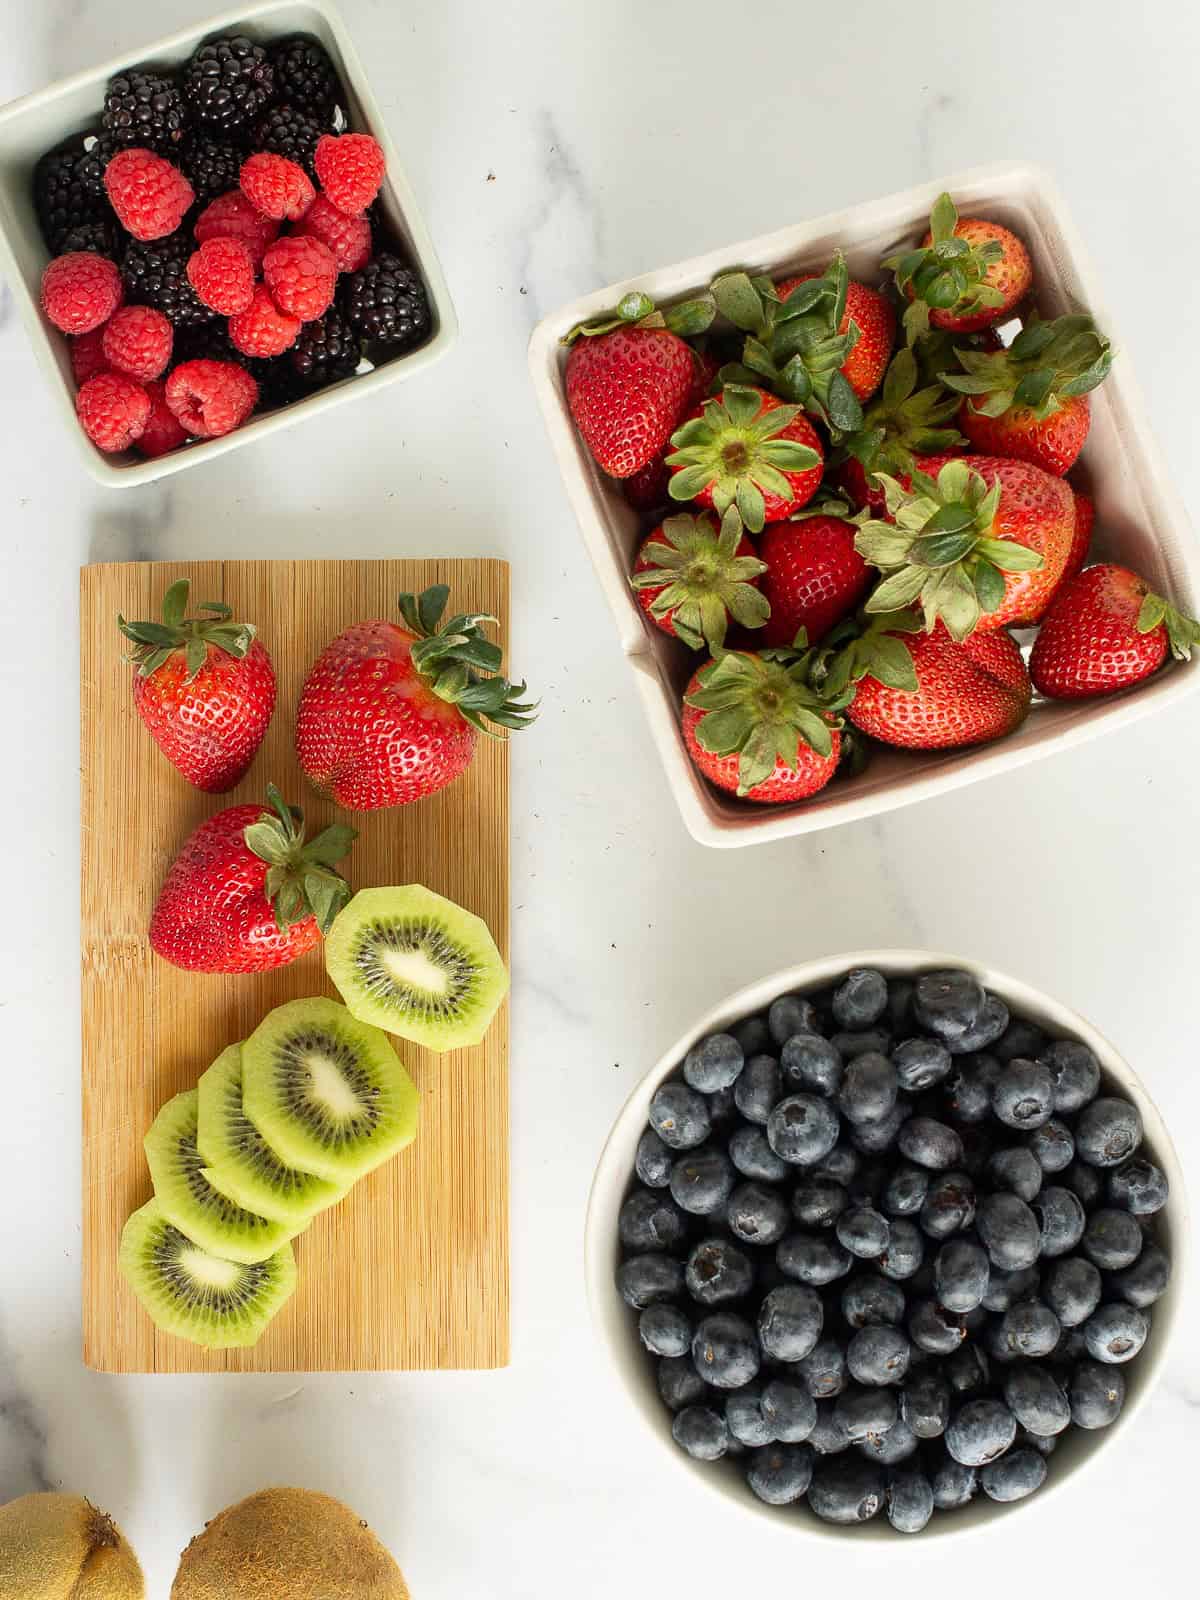
Choosing Fruit
The fruit is the centerpiece, so quality matters more here than in almost any other dessert. Use the ripest, most vibrant fruit you can find; whatever is in season in your region will always outperform fruit flown in from across the globe.
Spring and summer: Strawberries, raspberries, blueberries, blackberries. Choose strawberries without white shoulders near the stem, which means they were picked before ripe. Berries should be firm with no soft spots or mold.
Summer and fall: Peaches, plums, apricots, and cherries. Pick stone fruit that gives slightly to pressure but isn't mushy. Overripe stone fruit is difficult to slice cleanly and releases too much juice onto the cream.
Fall and winter: Caramelized apple or pear slices, orange segments, kumquats, and clementines. A brief caramelization on the stove in butter and sugar transforms fall fruit into tart-ready rockstars.
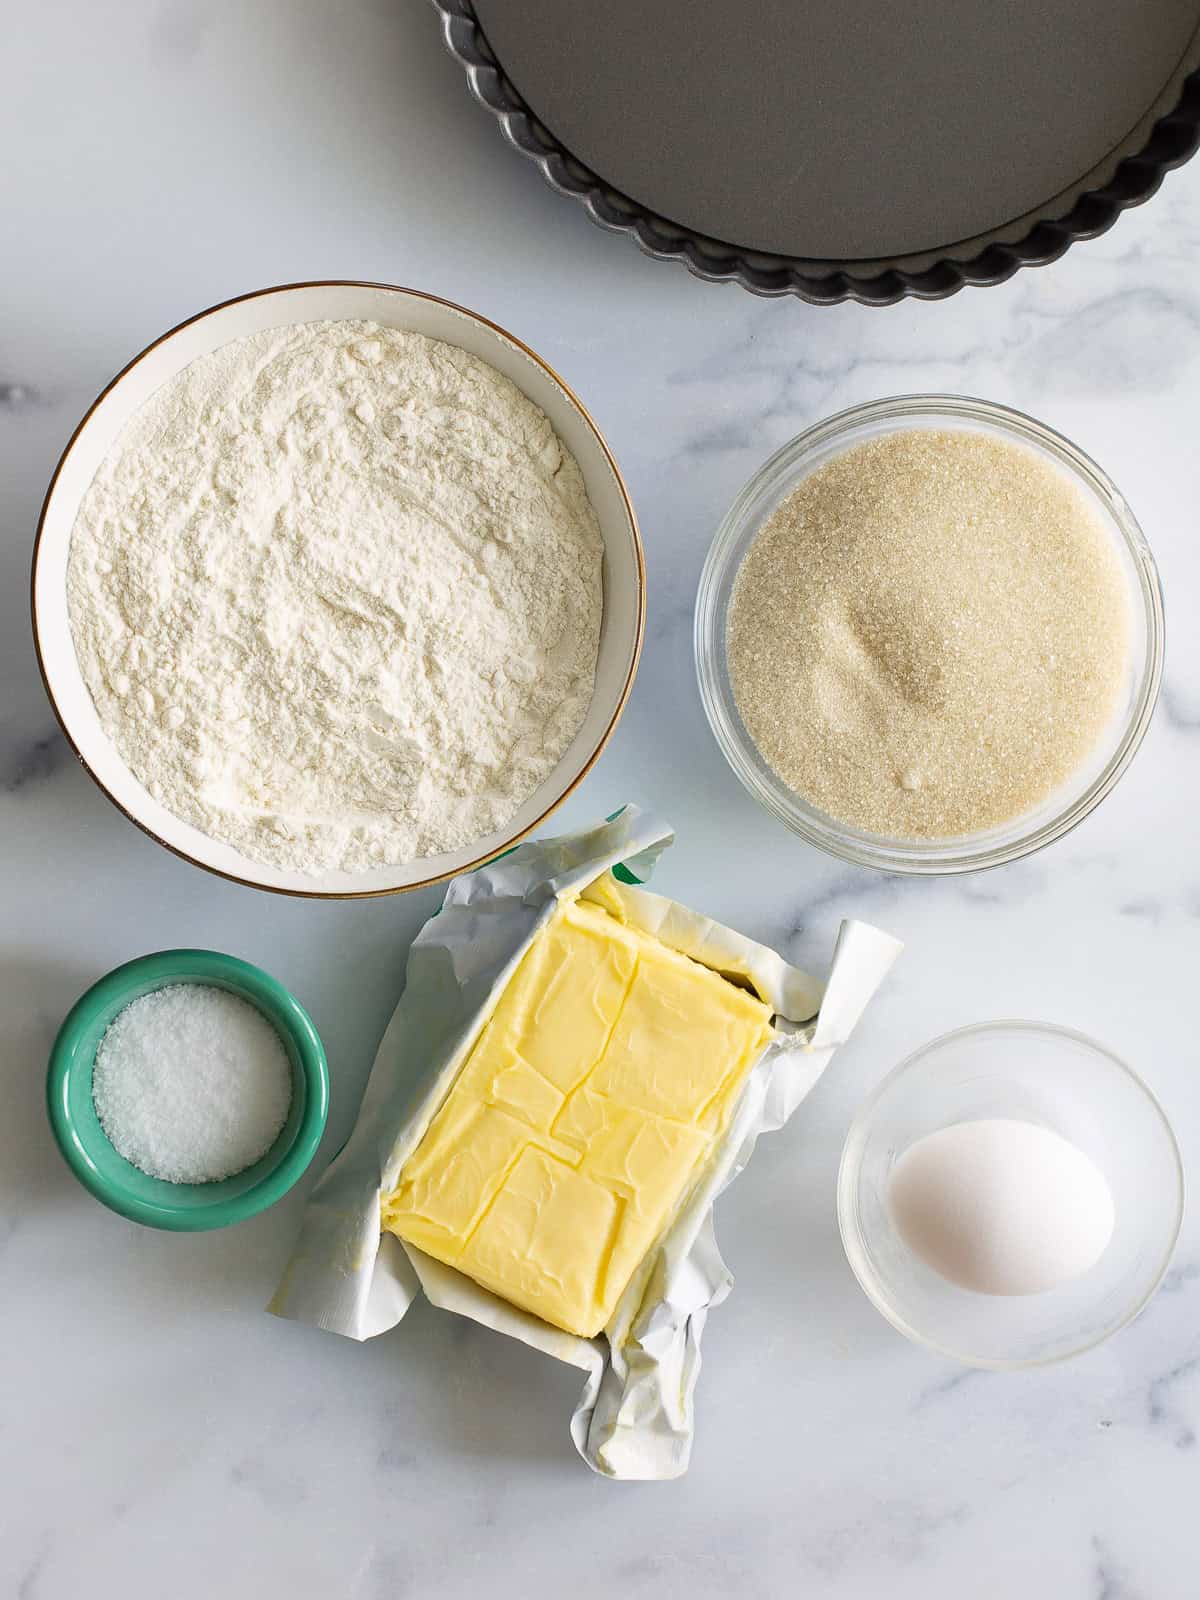
For the Tart Shell
If you've ever heard of "1-2-3 cookie dough", the name leaves little room for interpretation. It's a very common baker's formula for a sweet cookie dough or shortbread: one part sugar, two parts culinary fat (butter), and three parts flour.
1-2-3 Cookie Dough Formula
1 part sugar + 2 parts butter + 3 parts flour
by weight*
Baker's formulas use weight measurements. If you have a scale, you can measure and begin mixing dough in minutes. Without a scale:
- ½ cup (4 oz) of granulated sugar
- 1 stick (8 oz) of unsalted butter
- 2⅔ cups (12 oz) of all-purpose flour
- 1 egg, optional
A whole egg or egg yolk will lend stability and richness. Beat it in after creaming the butter and sugar.
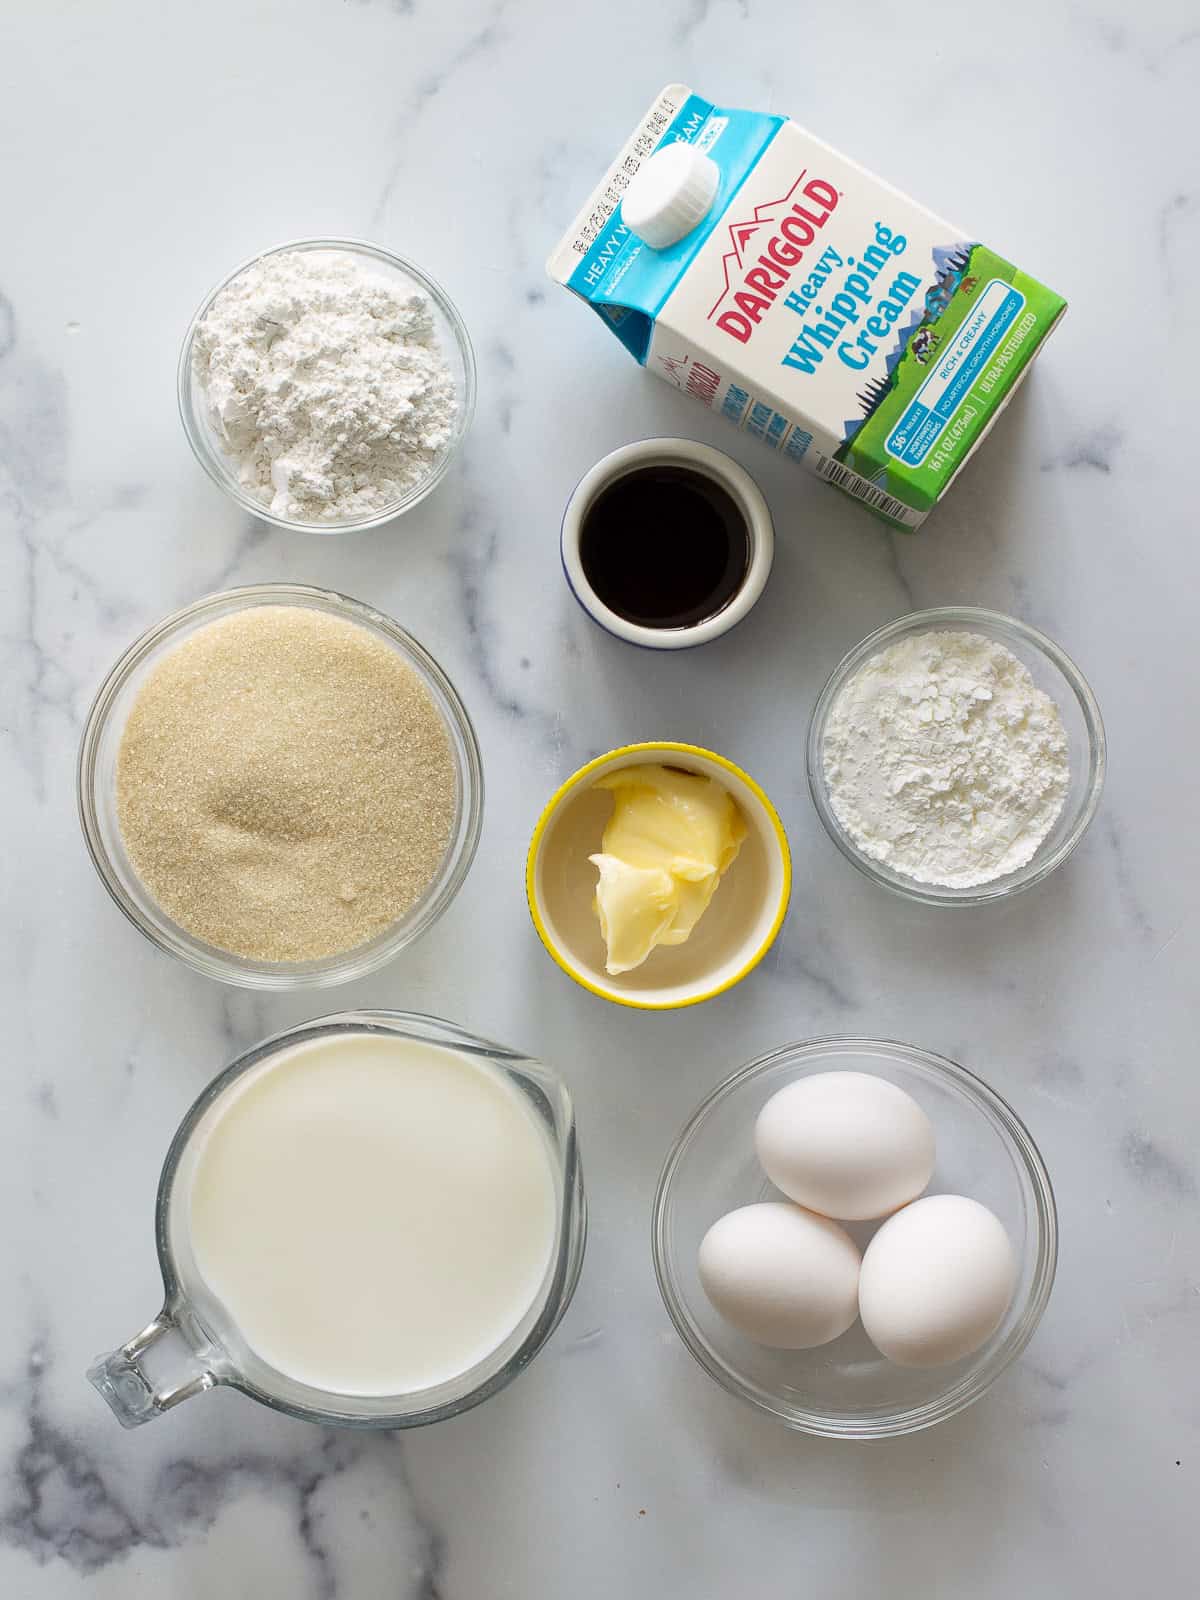
For the Pastry Cream
Like a tart shell, pastry cream is made from pantry staples: milk, eggs, sugar, cornstarch, and butter. It comes together in about fifteen minutes on the stove. Vanilla extract is the classic flavor; for a more intense taste and aroma, use vanilla bean seeds or vanilla bean paste. Diplomat cream is an optional, mousse-like variation - cold pastry cream folded with sweetened whipped cream. It's lighter and airier than pastry cream alone, and worth the extra step. You'll need heavy cream.
For deeper dives and a monthly recipe, I write a newsletter on Substack. It’s where I share the nutrition and food science behind recipes like this every month. Subscribe here.
How to Make a Fruit Tart
Step 1 — Making and Chilling the Dough
This technique for the tart shell is the creaming method. The process is akin to cookie dough, quick and simple. Especially if you keep your butter at room temperature, or set it out the night before. For a tender tart crust, mix the dough only until it comes together.
Overmixing develops gluten and makes the pastry tough. The machine doesn't matter - a stand mixer or handheld model (or your hands and lots of elbow grease), mix the dough all the same. Chilling is essential to allow the gluten proteins time to relax and helps prevent shrinkage in the oven. Cold dough also rolls more easily. Chill until the dough is hard throughout before rolling (the freezer is fastest).
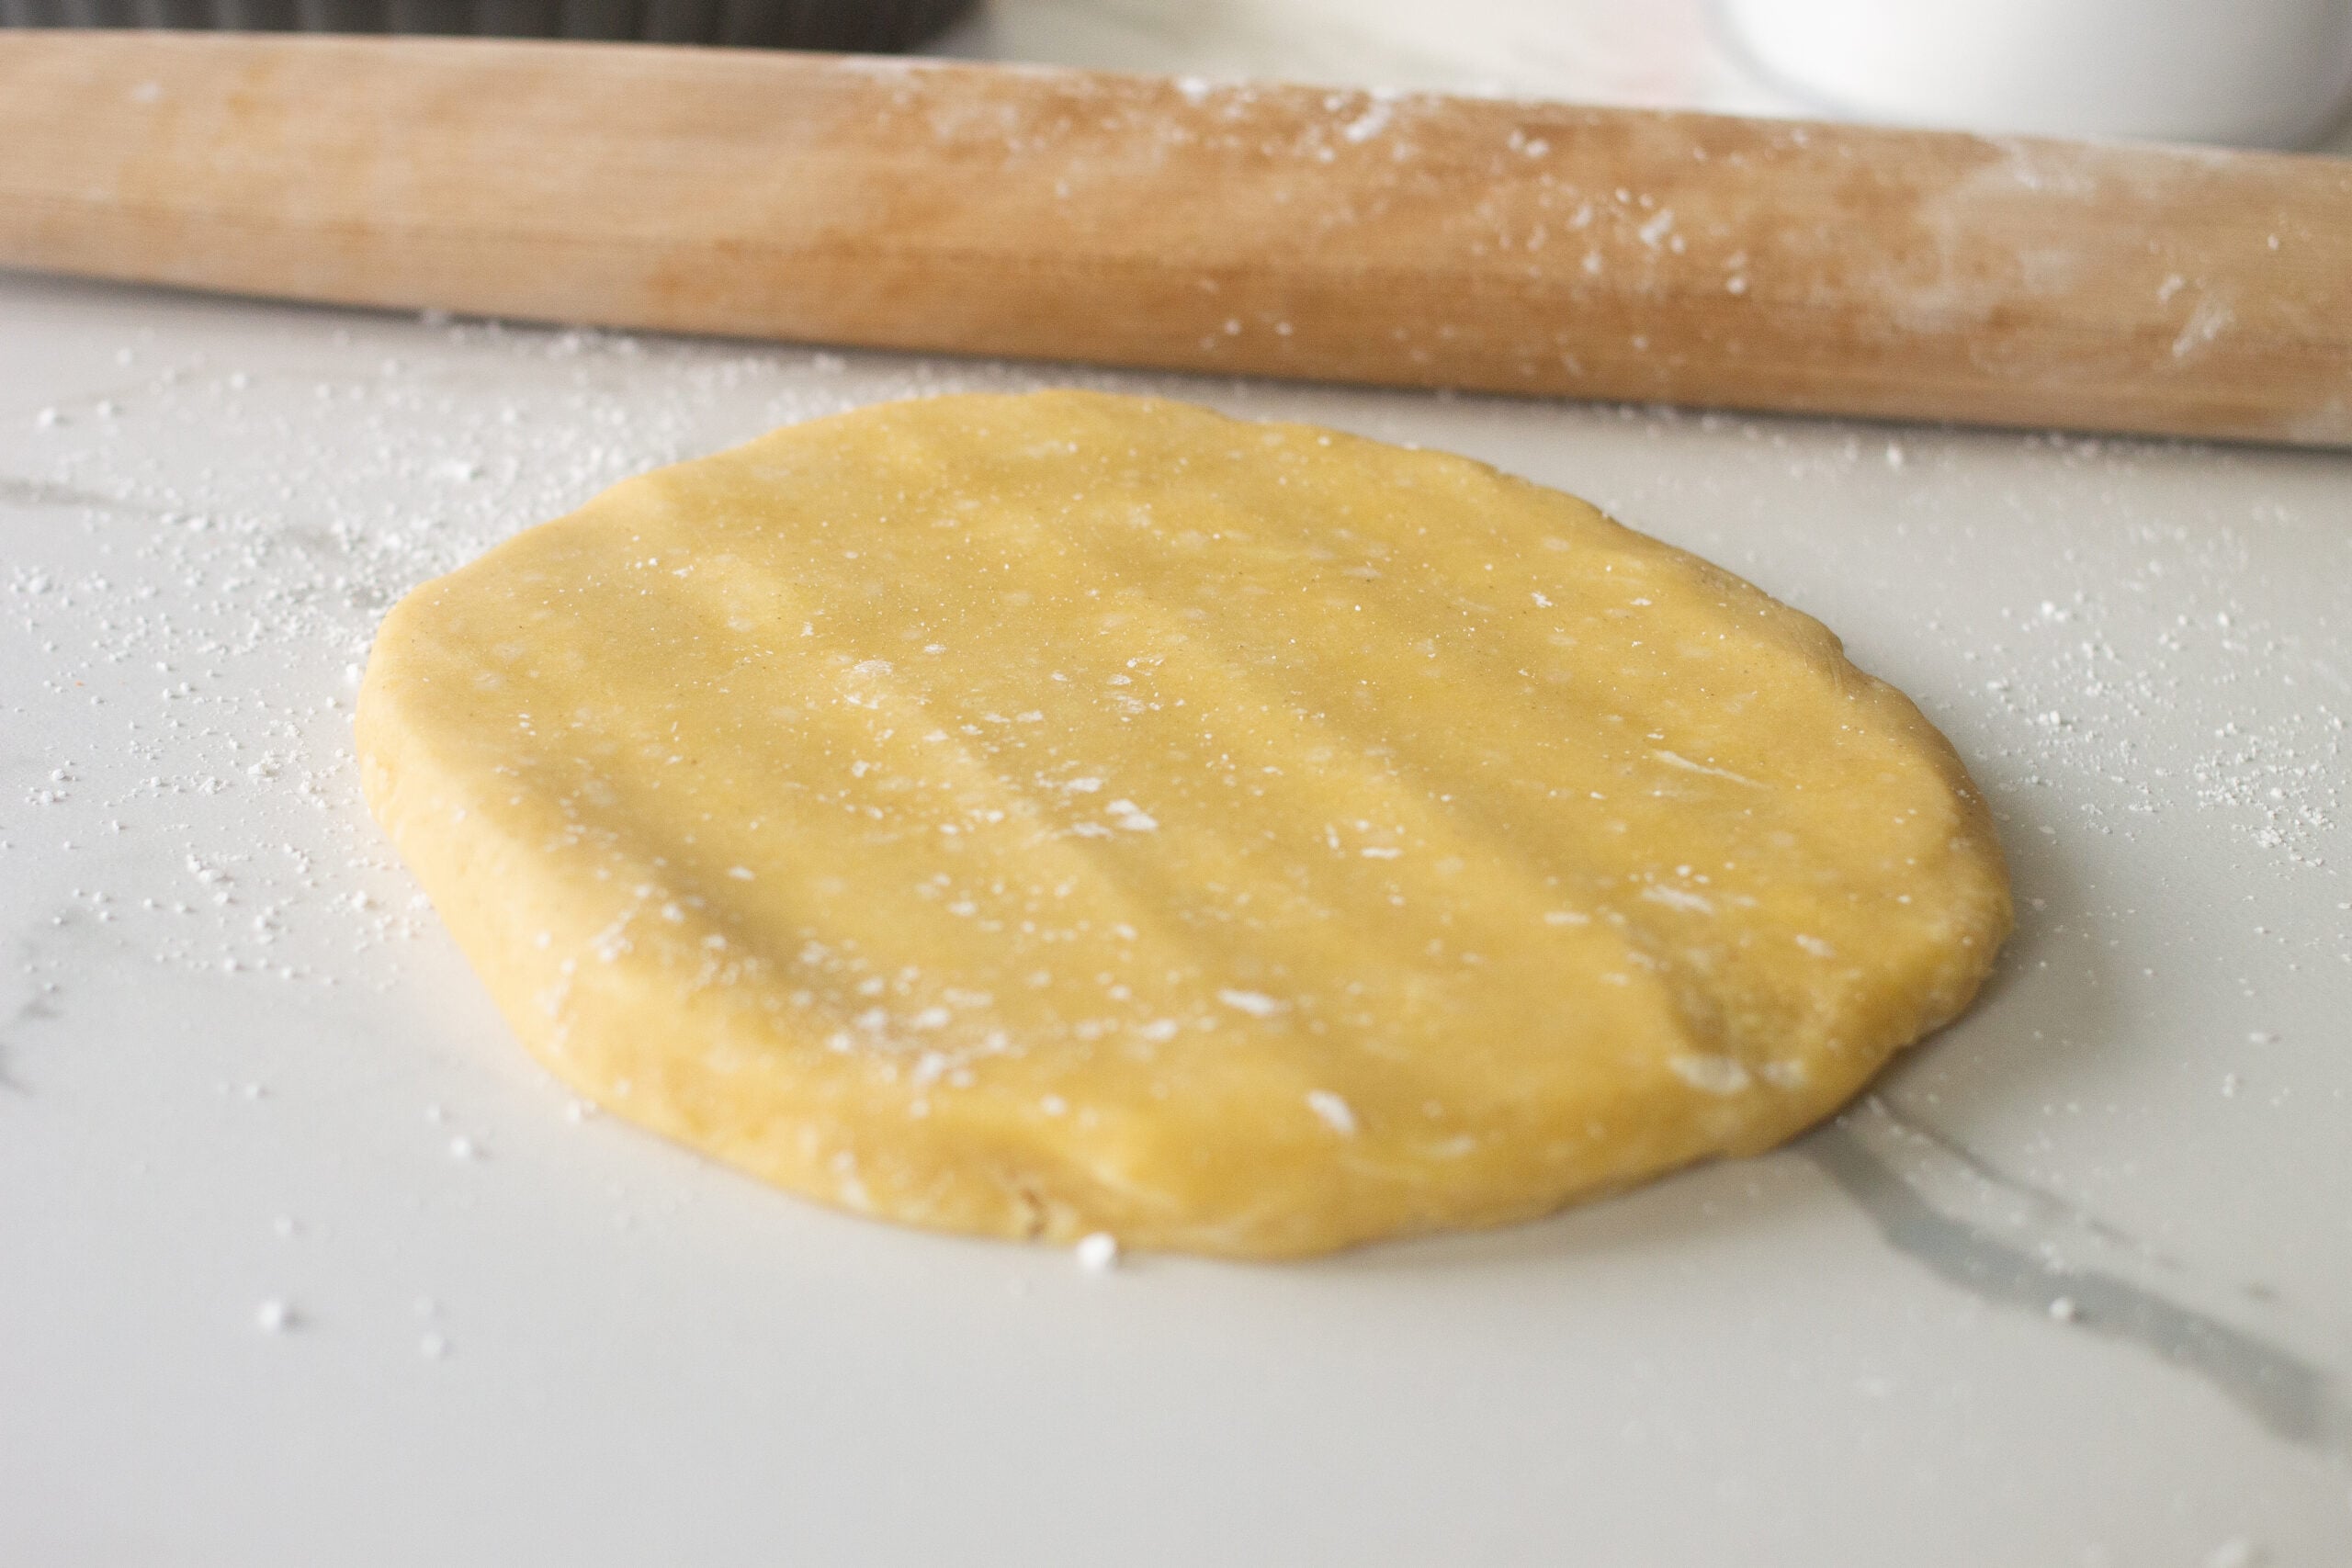
Step 2 — Roll and Press the Dough
To prevent the dough from sticking to your counter or board, roll it between two pieces of parchment paper (or at least on top of one). Then, a light sprinkle of powdered sugar on the paper and pin is all you need. Pastry dough rolled with flour is prone to becoming tough. Without parchment, sugar your surface well, and rotate the dough often to prevent sticking.
To roll an even circle: Start the pin at the center of the dough and roll away from you, then return to the middle and roll toward you. After each up and down pass, rotate a fifth of a turn. Rolling from the center out and rotating as you go keeps the thickness even and the shape round.
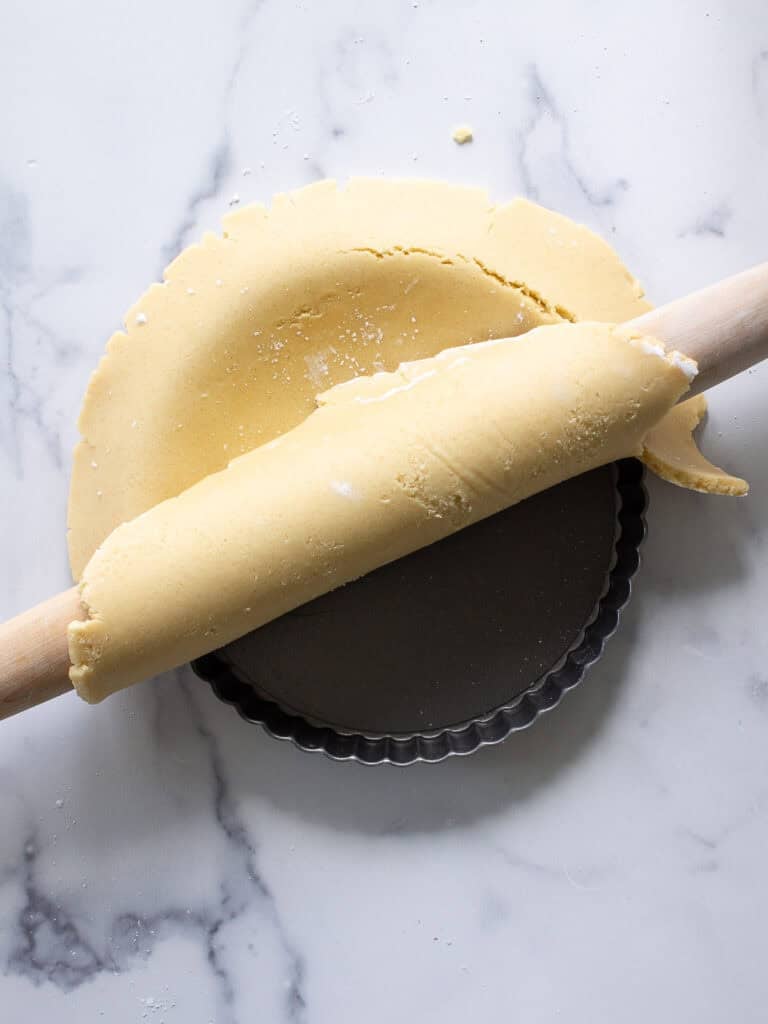
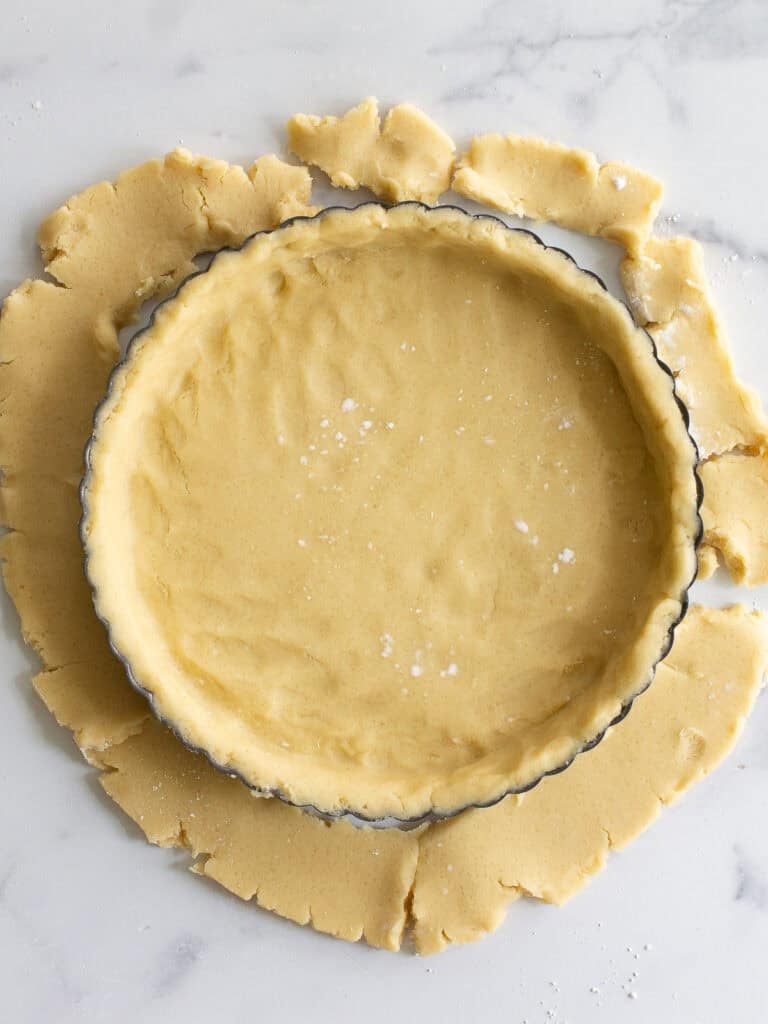
Aim for a circle two inches larger than your tart pan, and a quarter-inch thick. Drape the rolled dough over the pin to transfer it to the tart pan. Press it gently into the bottom and up the sides of the pan without stretching. Stretched dough shrinks in the oven and loses its shape. Clean up the edges by rolling the pin across the top of the pan. This will free the excess dough, which you can combine and roll for tartlets (mini tarts) or cookies. Freeze the dough until hard before baking.
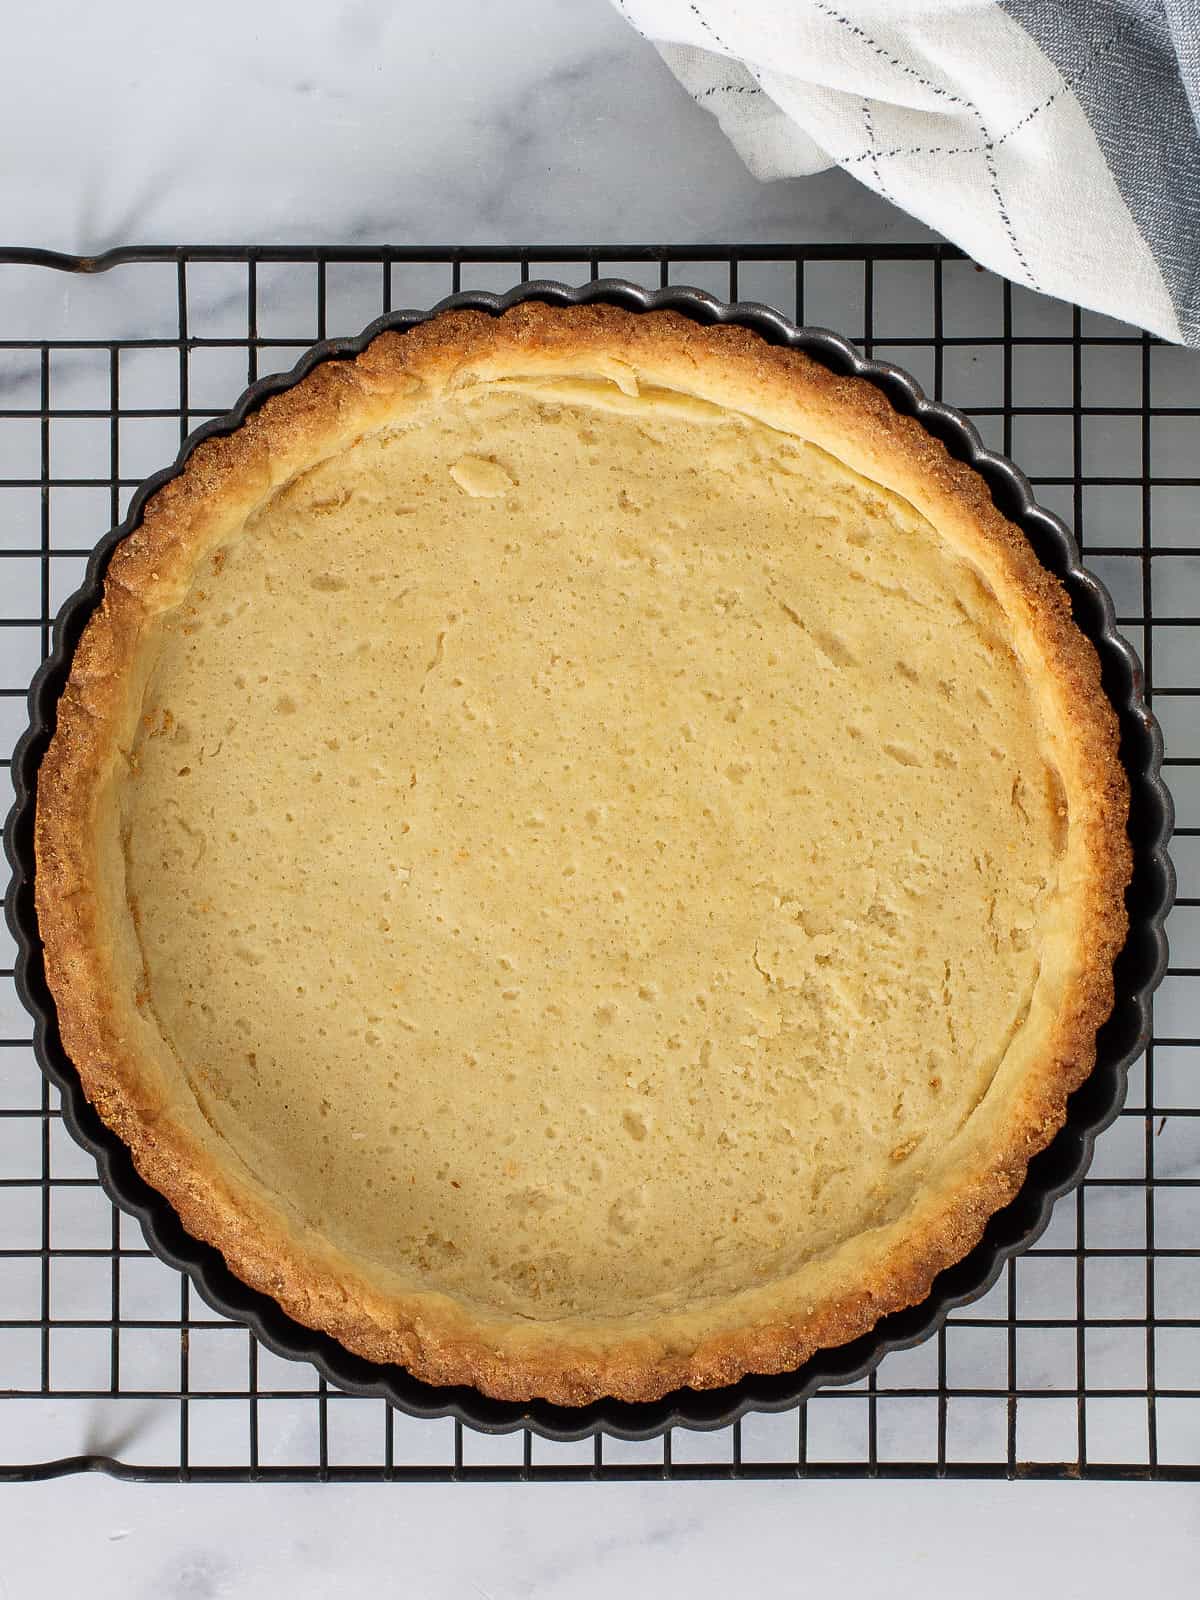
Step 3 — Bake the Shell
Preheat the oven to 350° F. Dock the bottom of the cold dough by pricking holes with a fork. Line the shell with crumpled-up parchment or foil and fill it with beans, rice, or even coins. This keeps the dough from shrinking back from the sides of the pan.
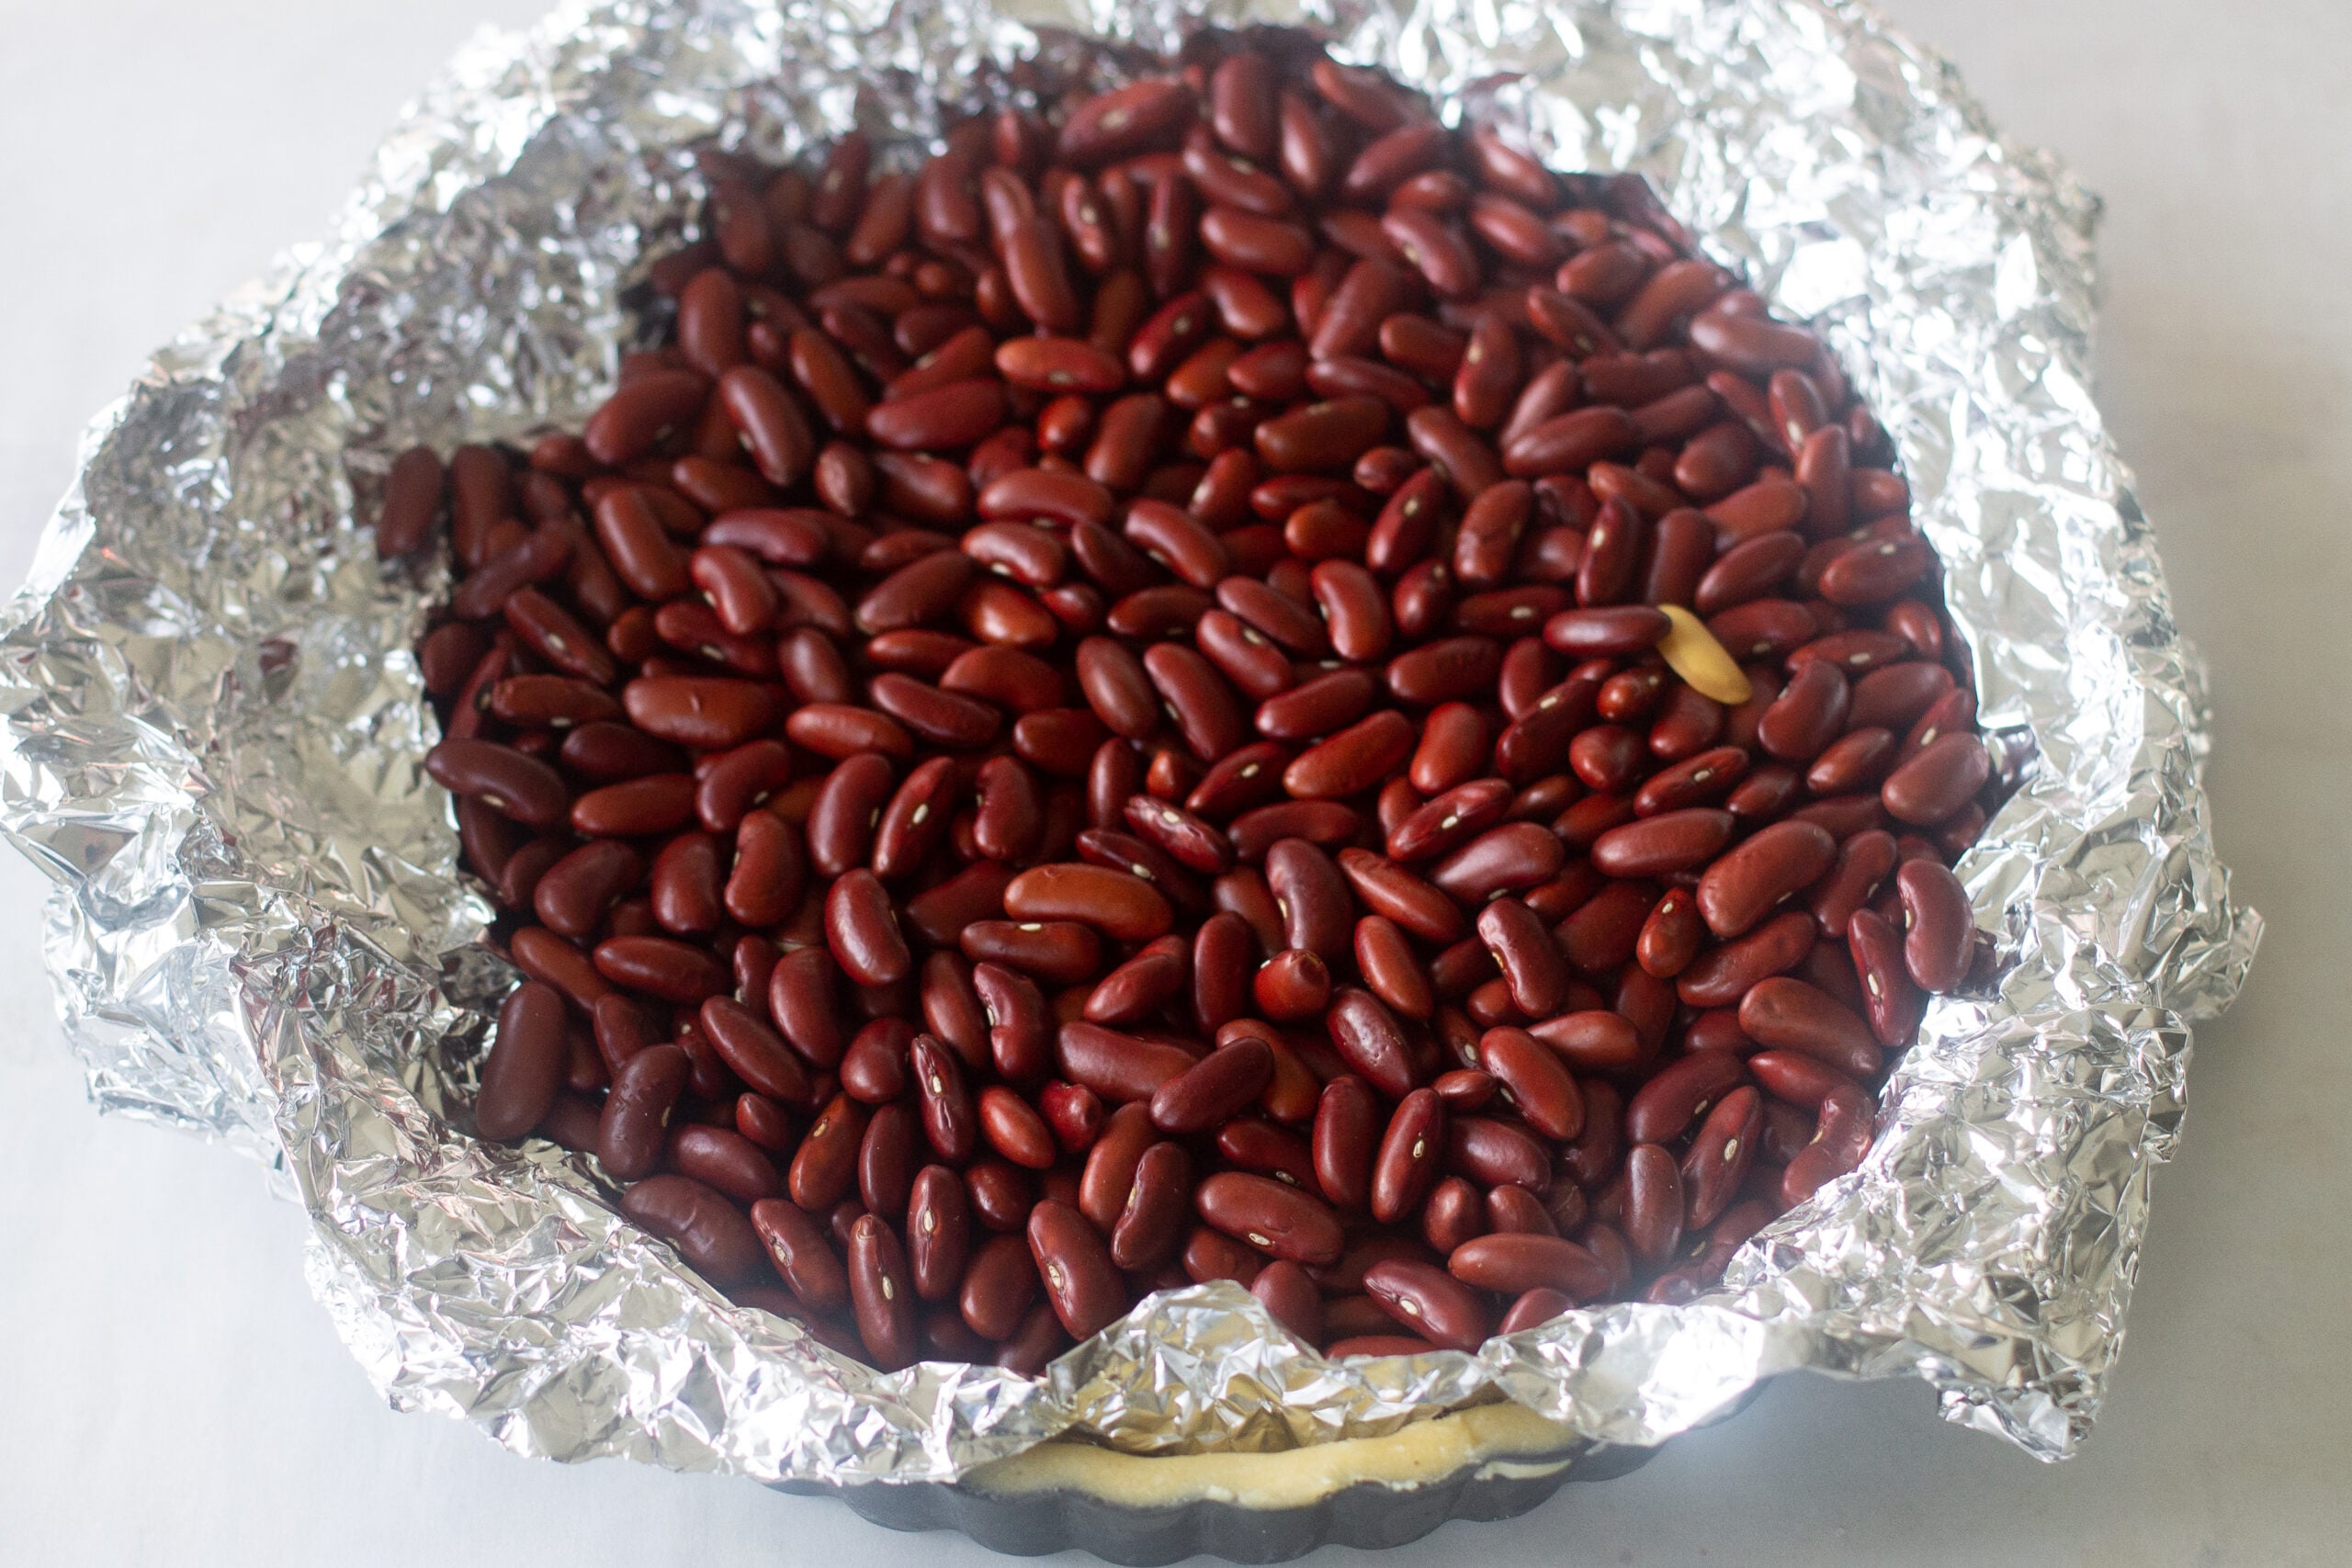
Bake until the bottom is fully set and lightly golden, between 30 and 45 minutes, depending on the size and thickness of your shell. Remove the liner and weights once the edges begin to brown and the bottom is no longer shiny. Err on the side of a pure golden brown; too light a bake, and the crust will soften once filled. Tart shells can be baked two days ahead and stored lightly covered at room temperature.
Step 4 — Cook the Pastry Cream
Whisk the eggs, cornstarch, and half the sugar in a heatproof bowl. Heat the remaining sugar, salt, and milk to just boiling, then slowly whisk the hot mixture into the egg mixture. This tempers the eggs and keeps them from scrambling on the stove. Return it all to the pot and cook over medium-low heat, whisking constantly, until the custard thickens (a bubble or two might break the surface). Low and slow is best, so you don't risk lumps from the cornstarch or eggs. Once it's thick and holds its shape, pour the pastry cream into a clean bowl.
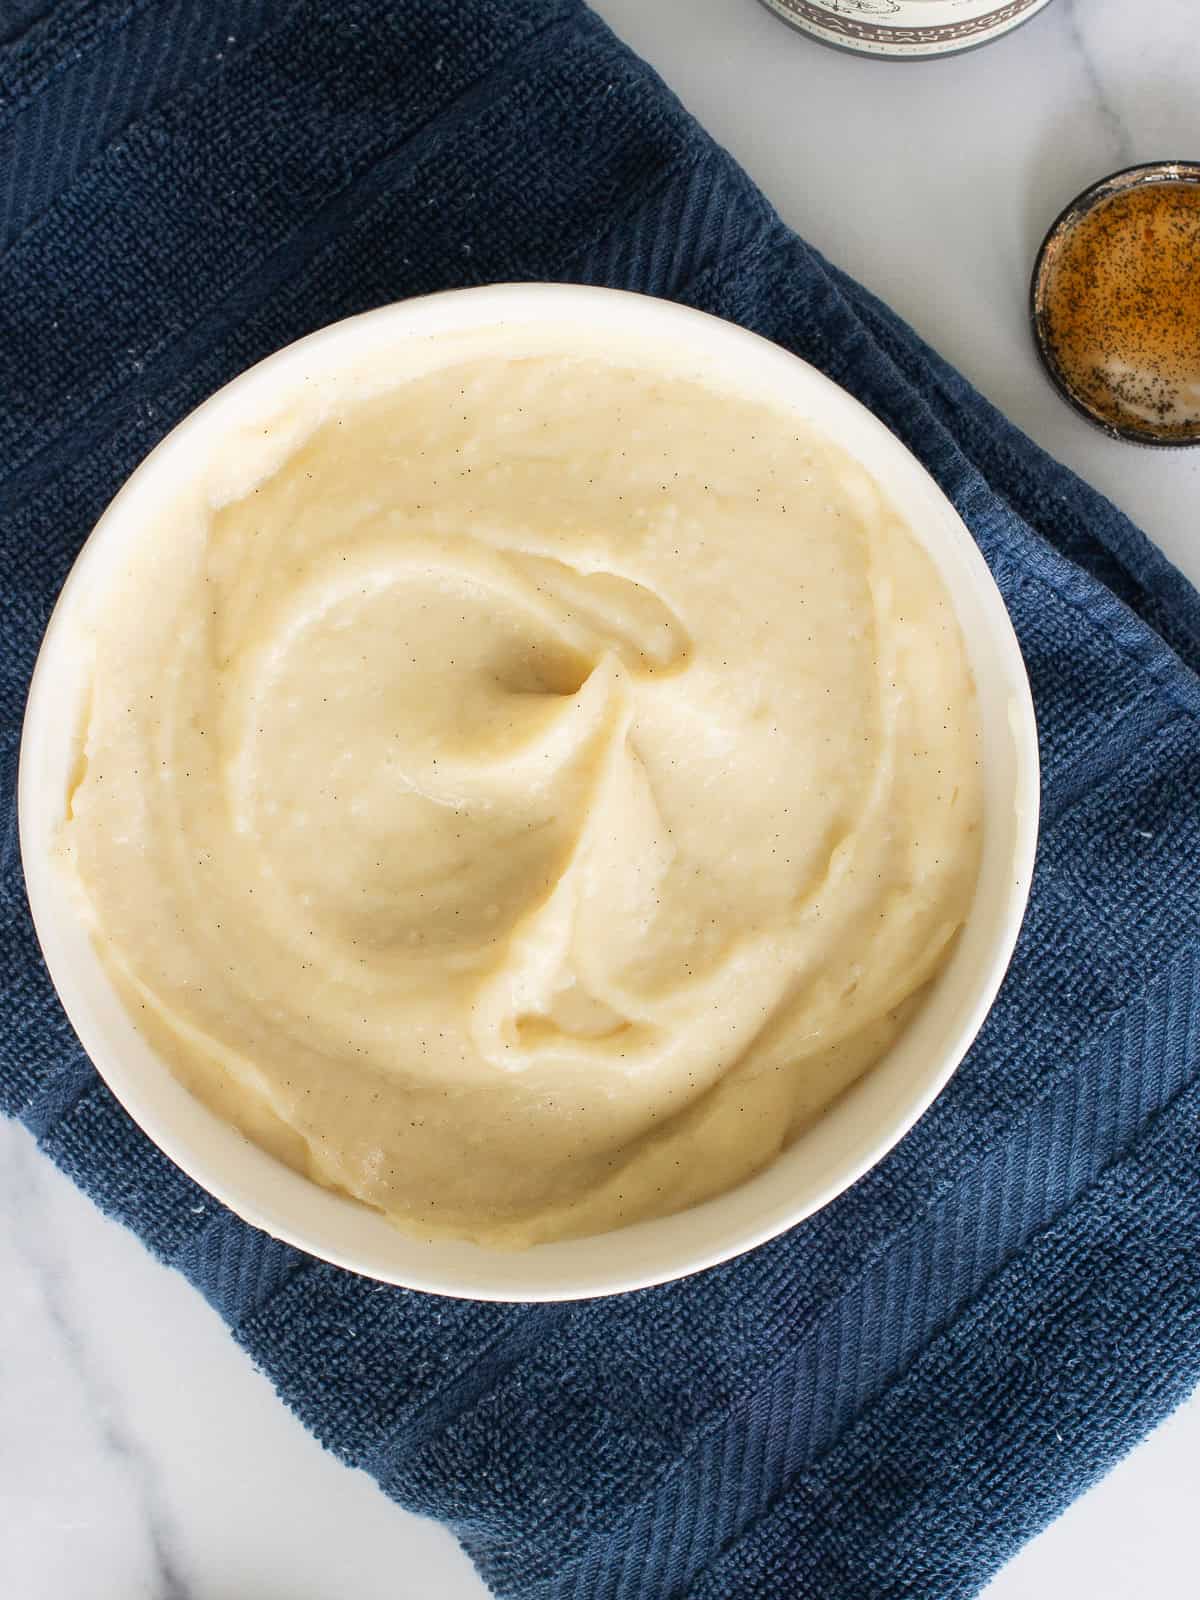
Off the heat, stir in the vanilla and butter. Press plastic wrap onto the surface and refrigerate for up to two days. Properly cooked pastry cream should be smooth and thick.
Lumpy pastry cream? Strain it through a fine-mesh sieve, pushing with a spatula to smooth the lumps.
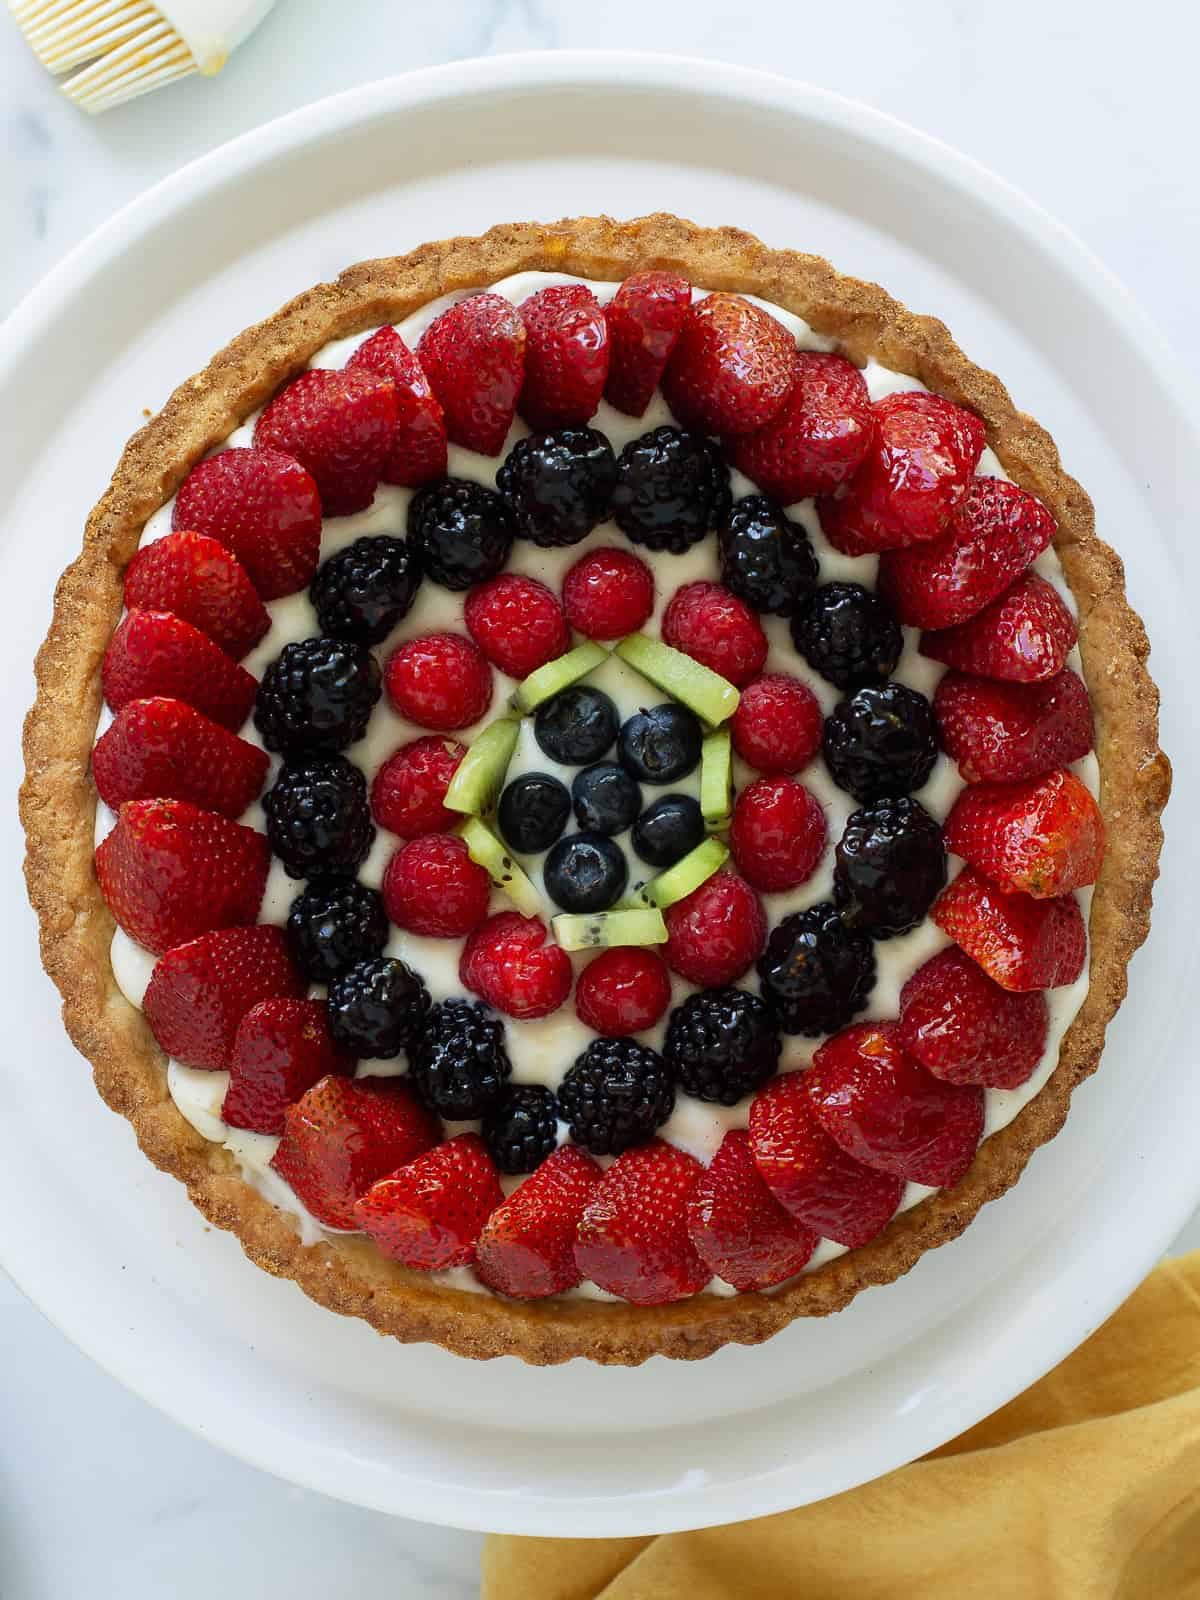
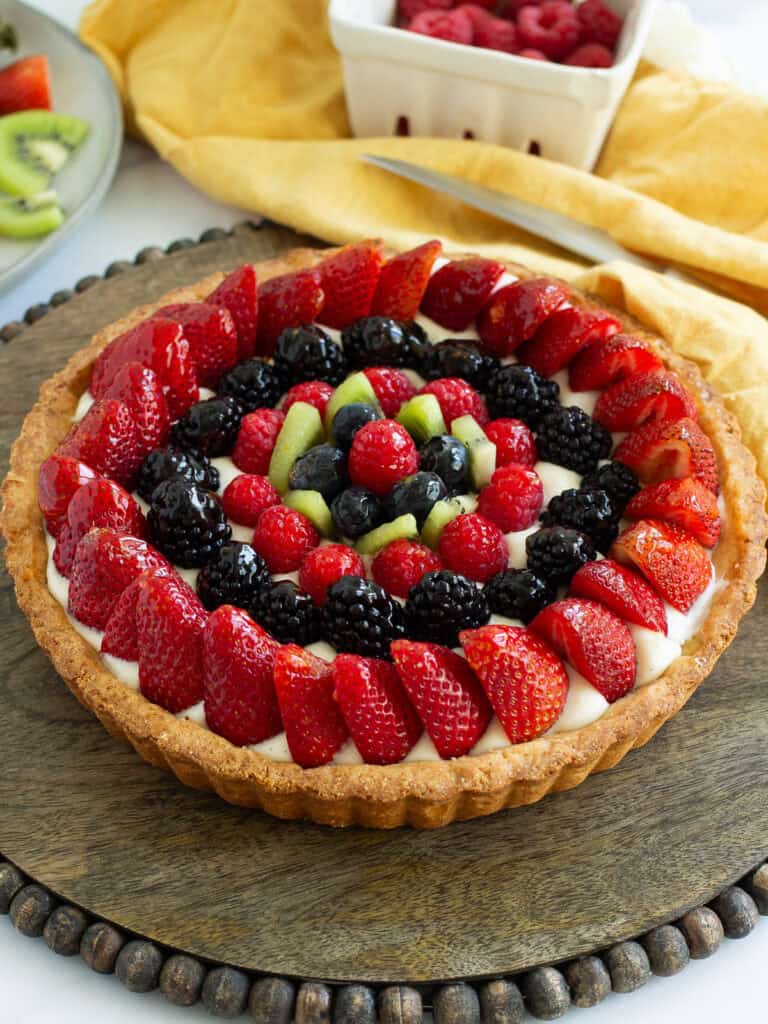
Step 5 — Assemble and glaze
Assemble the fruit tart only once both the shell and pastry cream are fully cooled. You can make both up to two days ahead, which makes this feel easier than it looks. Only lightly wash your fruit if you want, and pat it very dry before topping the tart. And the less you cut the fruit, the longer it stays bright, sturdy, and fresh.
Whole strawberries and thicker slices of kiwi will look and taste fresher longer than smaller pieces. Arrange the fruit snugly so it holds your chosen design, then brush with a lightly warmed apricot glaze. It lends a polished finish and keeps the fruit from drying out.

Chef's Tips
Consider the tartlet. Mini tarts are easier to handle, serve more cleanly, and look just as impressive. This recipe makes one 10- or 11-inch tart or 4 to 6 mini tarts, depending on pan size. The tiny pans can be ordered online or found at a restaurant supply store. Or you can press small portions of dough into the cups of a standard or jumbo muffin pan.

Use parchment for rolling, not flour. Extra flour on the dough's surface toughens the crust. Rolling the dough between two sheets of parchment gives you a clean, even roll with zero sticking. Especially if you are attempting a gluten-free crust, parchment makes rolling much easier. If your dough falls apart during rolling (and it happens to the best bakers), just press it into the pan and move on.
Don't skip the glaze. It takes 90 seconds and takes the finished tart from homemade to professional. Truly, any jam you have on hand works; strain out fruit pieces if it's chunky.
Experiment with fillings. While pastry cream is traditional, a soft ganache or a fruit filling, such as lemon curd, adds a delicious contrast of color and flavor.
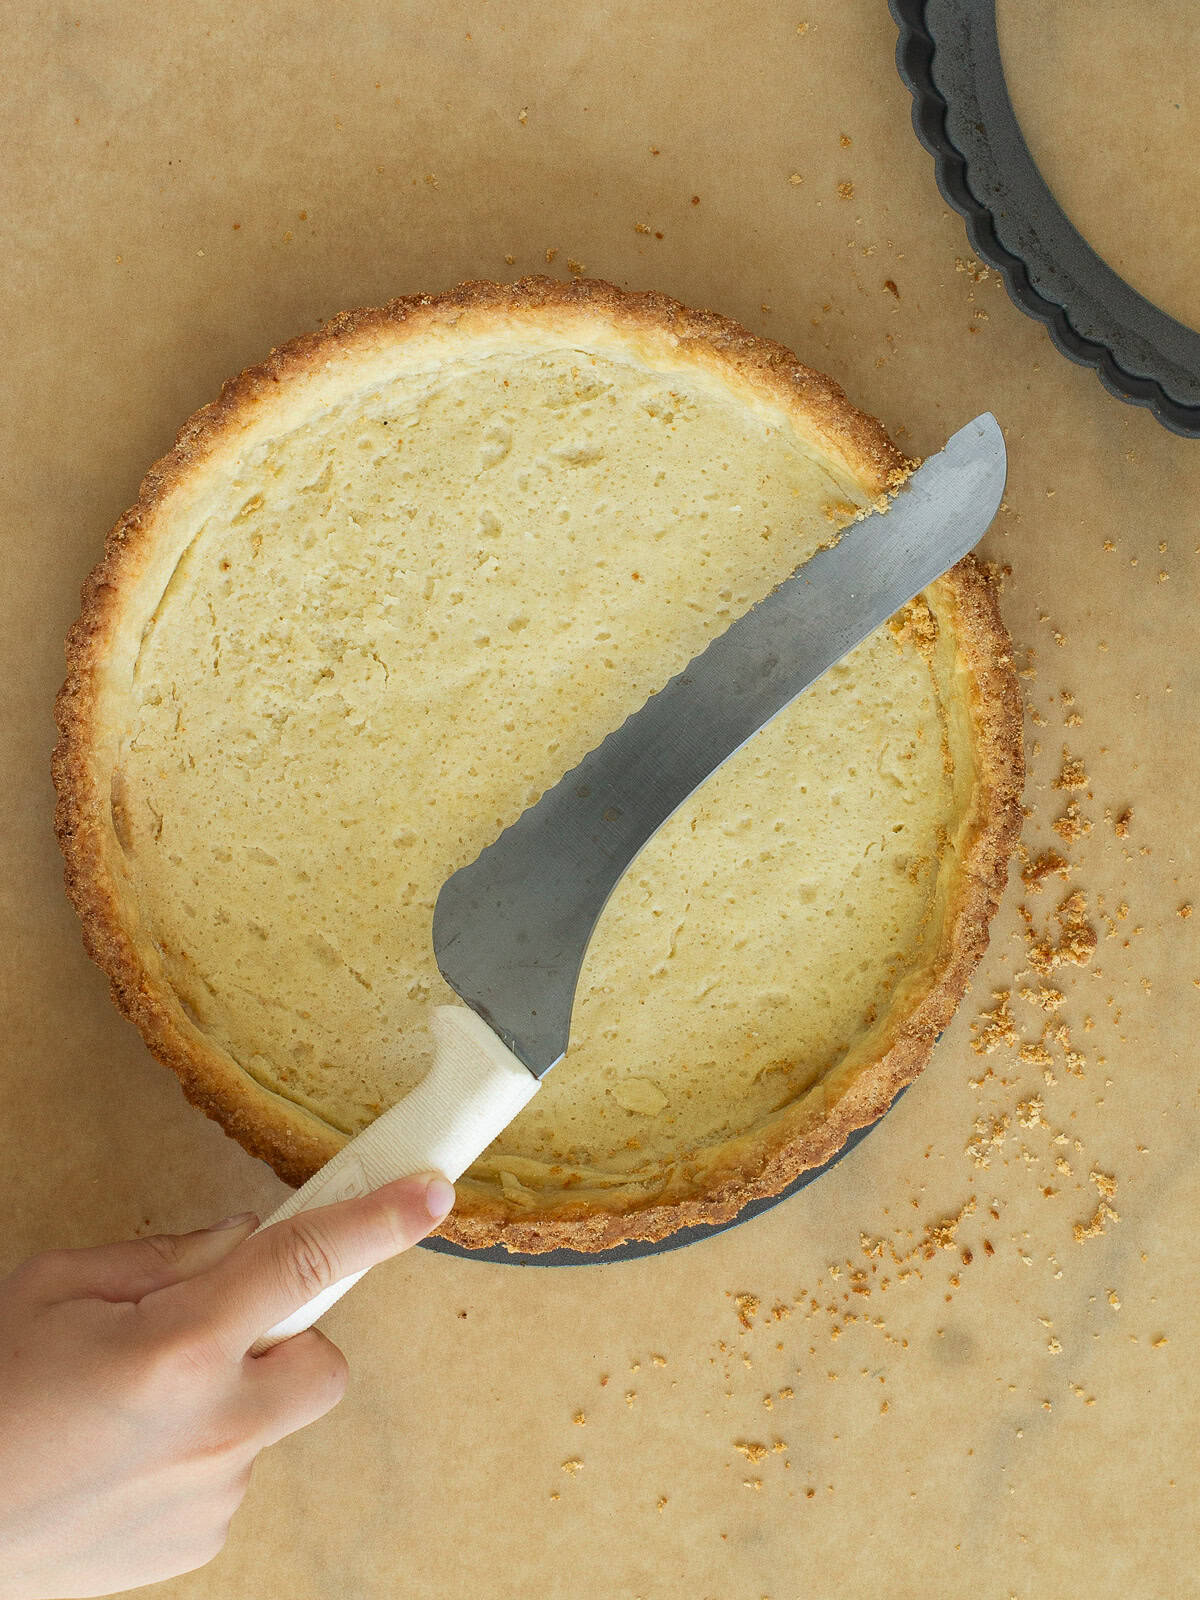
Salvage dark edges. If the top edge of the pastry crust browned excessively during baking, use a serrated knife to gently shave it down - short, light strokes, like sanding wood, to reveal the lighter crust beneath. It's a trick used in Michelin-star kitchens, no kidding.
Storage
Store finished tarts in the refrigerator for only a day or so. As the tart sits, the shell will soften, so they're best served within 24 hours. Extra pastry cream will keep chilled for a week. Freeze any leftover dough wrapped tightly for a few months.
Gluten-Free Variation
For gluten-free tart shells, a measure-for-measure flour blend works great. For a vegan tart shell, omit the egg and replace the butter with your favorite plant-based "butter," but only one that resembles the texture of real butter at room temperature. A vegan pastry cream is harder to achieve. They often turn out less than smooth and lacking richness, but your favorite vegan vanilla pudding is a great substitution.
Frequently Asked Questions
Pre-made tart shells are a reasonable shortcut, and the pastry cream in this recipe works beautifully in them. Homemade shells will taste fresher and lend a better flavor and texture. But with a rich, homemade custard filling and fresh fruit, a homemade tart shell won't be missed.
The two most common causes are stretching during rolling and skipping the chilling step. The dough wasn't chilled enough before baking, or the shell wasn't blind-baked with weights. Freezing the dough in the pan for 20 minutes before baking and using weights significantly reduces shrinkage.
Diplomat cream, or crème diplomate in French pastry, is pastry cream lightened by folding in whipped cream. It's silkier than basic pastry cream and is what most professional patisseries use in their fruit tarts. The tradeoff is that it's less stable, assemble tarts with diplomat cream the day of serving.
Pastry cream (crème pâtissière) is a thick, cooked custard made from milk, eggs, sugar, and cornstarch. It's the standard filling for fresh fruit tarts and eclairs. It tastes like a rich, silky vanilla pudding and sets firm enough to (mostly) hold its shape when sliced.
A fruit tart becomes soggy when the crust is underbaked, the pastry cream is too loose, or the tart sits assembled too long. Moisture from the filling and fruit will soften the crust if it isn’t fully set. Fresh fruit tarts are best served the day they are made, or within 24 hours of assembly.
Fruit tart questions or variations you've tried? Leave them in the comments along with your review.
📖 Recipe
Classic Fruit Tart
A classically trained chef’s recipe for a French-style fruit tart with a crisp, buttery crust, silky pastry cream, and fresh seasonal fruit that slices cleanly and never turns soggy.
- Total Time: 3.5 Hours
- Yield: A 9", 10" or 11" tart, or 6 mini tarts 1x
Ingredients
Tart Shell
- 4 ounces (½ cup) of granulated sugar
- 8 ounces (2 sticks) of unsalted butter, softened
- 1 large egg, room temperature
- 12 ounces (about 2¼ cups) of all-purpose flour
- pinch of salt, optional
Pastry Cream
- 2 cups of whole milk (2% is fine)
- ½ cup of granulated sugar (125 grams)
- pinch of salt
- ¼ cup + 2 tablespoons of cornstarch (about 42 grams)
- 3 large eggs, room temperature
- 2 tablespoons of vanilla extract or seeds scraped from a vanilla bean
- 2 tablespoons of unsalted butter
Fruit & Glaze
- 1 pound of seasonal fruit, such as berries, kiwi, or mango
- apricot jam, warmed slightly, for glazing
Instructions
- Make the dough. Beat the butter, sugar, and salt until smooth and lightened, then mix in the egg. Scrape the bowl and beater, then add the flour a little at a time on low speed just until the dough comes together. Form it into a disc, wrap, and chill for two hours or until hard. Roll softened but still cold dough between two pieces of parchment to ¼-inch thick, then press into the tart pan(s). Trim any excess around the edges, dock with a fork, and freeze until hard.
- Cook the pastry cream. In a heat-proof bowl, whisk together the eggs, cornstarch and half the sugar. Combine the remaining sugar, salt, and milk in a medium pot and bring just to a boil. Slowly pour the hot milk mixture into the egg mixture while whisking constantly. Return the tempered liquid to the pot, and cook over medium-low heat, while whisking constantly. Continue to cook the custard until it thickens and bubbles begin to break the surface, about five minutes. Remove from the heat, and stir in the vanilla and butter. If the custard is lumpy, strain it through a fine-mesh sieve. Press storage wrap or similar onto the surface of the cooked cream, and chill for up to two days.
- Bake the shell at 350° F. Line the tart pan with foil or crumpled parchment and fill with pie weights, dried beans, or coins. Bake for 15 to 20 minutes, then remove the weights and lining. Continue baking until the bottom is matte, lightly golden, and fully set. It should feel firm when tapped. If the edges brown too quickly, cover them loosely with foil. Let the crust cool completely before using, or store lightly covered at room temperature for up to two days.
- Assemble the tarts. Lift the shell out of the pan carefully by pressing up on the bottom. Then fill the cooled shell(s) with the pastry cream, spreading it level with an offset spatula or the back of a spoon. For a lighter filling of crème diplomate (diplomat cream), fold sweetened whipped cream into the pastry cream before filling. Top with fruit, brush with warmed apricot jam, and serve. Store finished tarts chilled for up to 24 hours, but serve at room temperature.
Notes
For diplomat cream. To lighten the pastry cream into diplomat cream before filling the shell, whip ½ cup of heavy cream with 2 tablespoons of confectioner's sugar to medium peaks. Then fold gently into the pastry cream with a spatula.
Equipment. You will need a 9" to 11" tart pan with a removable bottom, or mini tart pans (the latter often come in one piece). A hand mixer, stand mixer with the paddle attachment, or even your hands and a wooden spoon, can be used to mix the dough. A pastry brush is great for glazing the fruit with jam.
- Prep Time: 40 minutes
- Cook Time: 30 - 45 minutes
- Category: Desserts
- Method: Baking
- Cuisine: French
Nutrition
- Serving Size: 1 11" Tart
- Calories: 375
- Sugar: 20.4 g
- Sodium: 286.8 mg
- Fat: 20.4 g
- Carbohydrates: 41.5 g
- Protein: 6 g
- Cholesterol: 111.9 mg
Eat Informed
The Edible Times Newsletter on Substack, written by Chef Christina, covers the nutrition and cooking science behind ingredients and recipes like this every month. Complete with a new nutrient-dense, approachable recipe.
Totally Free. No ads. No brand influence.


Amber
Was pleasantly surprised how great this came together! Was the perfect desert for our Derby party this past weekend. Received many compliments on the filling!
Hailey
Making these tomorrow for a brunch. Can you double the dough recipe in the same batch? Thanks!
Chef Christina, CCMP
Hi Hailey!
Absolutely you can double it. Use the toggle in the recipe card and just make sure your mixing bowl is big enough. It’ll be a lot of flour! The pastry cream doubled should work fine still in a medium to large pot.
Wanda
I am going to be making these. Whole wheat flour isn't an option but AP or cake flour is. How much almond flour would you mix in? Swap in 1/4 of the amount of wheat flour?
Chef Christina
A quarter of almond flour would work and not compromise the dough. All-purpose works well, cake flour is lower in gluten and it wouldn't be as sturdy as crust.
Wanda
I love this idea! Can you tell me how long the tarts will last once they are assembled? Can I make them on Thursday to serve on Friday or Saturday?
Chef Christina
Hi Wanda! Absolutely, you can make the tart shell and any custard filling a couple of days ahead. For best results assemble the tarts the day you plan to serve them. Plenty of pastry shops make and keep them for a few days, but I find the textures are best when assembled the morning of. Each day a filled tart shell sits it softens a little. So be sure to bake the crust well if you plan to fill them a day ahead. 🙂
Ryan Rose
I love homemade tarts. These looks absolutely delicious!